
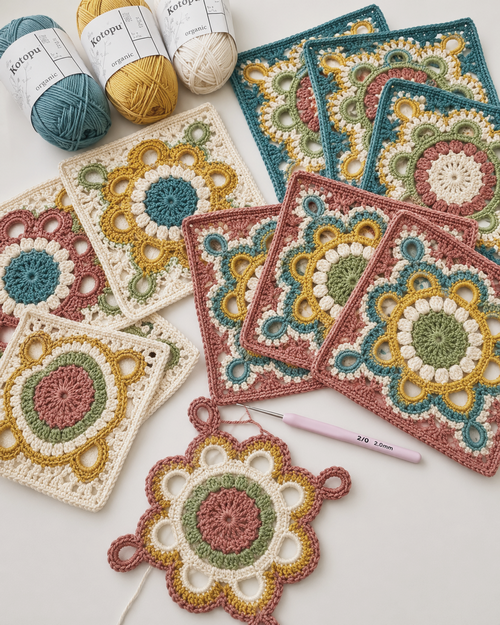
The Turkish Crochet Square is a charming and detailed motif that brings together delicate arches, textured stitches, and geometric shapes. Its layered design gives each square plenty of visual interest, making it a wonderful choice for blankets, cushion covers, table decorations, bags, and other crochet projects.
You can make the motif in a single color for a classic look or experiment with several shades to highlight each round. Once you have made a few squares, they can easily be joined together to create a larger project.
Turkish Crochet Square Pattern
Materials
- Yarn of your choice
- Crochet hook suitable for your yarn
- Scissors
- Tapestry needle
Abbreviations
- ch – chain
- sc – single crochet
- dc – double crochet
- sl st – slip stitch
How to Crochet the Turkish Square
Round 1
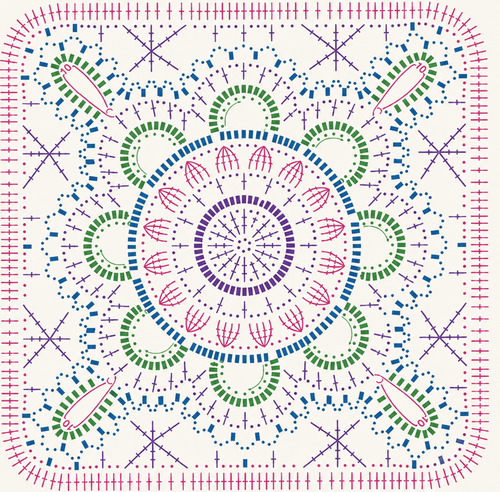
Chain 6 and join with a slip stitch to form a ring.
Round 2
Work 16 double crochets into the center of the ring. Join with a slip stitch to the first double crochet to complete the round.
Round 3
Work 1 single crochet into each double crochet from the previous round.
Then, work 2 double crochets into the spaces between the double crochets around the circle. This round gradually increases the size of the motif.
Round 4
Work 1 double crochet in each double crochet from the previous round.
Chain 3, then continue repeating the same sequence around the motif to create an open, lattice-like texture.
Round 5
Working into each chain-3 space, make 4 double crochets and close the group together.
Chain 4 and repeat the same pattern around the entire round. These grouped stitches begin to create the decorative texture of the square.
Round 6
Work 1 single crochet into the point where the group of 4 double crochets was closed.
In the next chain-4 space, work 5 single crochets. Then chain 11 and join with a single crochet to form an arch.
Inside the arch, chain 2 and work 18 single crochets. Continue around the motif, alternating the single-crochet sections with the larger arches.
Round 7
Begin in the first arch with 1 single crochet, then chain 2. Skip the next single crochet and repeat around the arch. Continue in this way until you have 9 double-crochet sections separated by chain-2 spaces.
Chain 1 and move to the next section.
Work 5 double crochets, placing 2 chains between each double crochet and skipping 1 single crochet between the stitches.
Next, chain 10 and close the chain with a buttonhole-style loop at the final double crochet. Inside this loop, chain 2 and work 18 single crochets.
Slip stitch at the base of the loop, then continue the pattern by alternating chain-2 spaces and double crochets while skipping 1 single crochet between stitches. Continue until you reach the end of the second arch.
Round 8
In each chain-2 space from the previous round, work 1 single crochet followed by 4 chains.
Move to the next arch with 1 chain and work 1 single crochet. Repeat the same sequence three more times until you reach the buttonhole section.
Work 1 single crochet into the buttonhole, followed by 4 chains. This creates a series of 9 small arches.
Continue repeating the pattern around the motif.
Round 9
Using small slip stitches, move across to the fourth arch of the previous round.
Chain 5, with the first 2 chains counting as a single crochet, then work 1 single crochet into the next loop.
Chain 2, skip the next loop, and work a three-loop double crochet. Chain 2, skip another loop, and make another three-loop double crochet.
In the first loop containing a buttonhole, begin another three-loop double crochet but do not close it completely. Move into the next three-loop double crochet and complete the stitch to create a crossed group of three double crochets.
Chain 2, skip the next loop, and work 1 single crochet. Chain 3 and repeat the same sequence twice more.
Continue alternating these stitch combinations around the motif until the round is complete.
Round 10
Work 2 single crochets into each chain space from the previous round.
In the spaces immediately before and after each group of three double crochets, work 3 single crochets.
At each corner, where the buttonhole sections are located, work 2 single crochets, chain 2, and 2 single crochets into the same arch. These corner stitches help define the square shape.
Round 11
Work 1 single crochet, then chain 1. Skip the next stitch from the previous round and repeat this sequence all the way around.
Fasten off and weave in any remaining ends with a tapestry needle.
Finishing Your Turkish Crochet Square
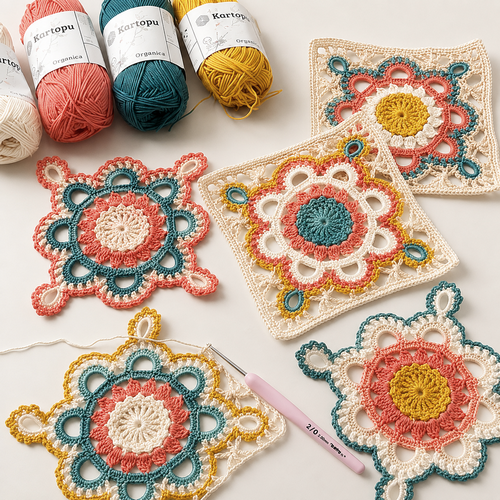
The finished motif has a beautiful combination of open arches, textured stitch groups, and defined corners. Make several squares and join them together to create a cozy blanket, colorful afghan, cushion cover, or other decorative project.
For a modern look, try using two or three coordinating colors and change the yarn at different rounds. For a more traditional appearance, make the entire square in one shade so the intricate stitchwork takes center stage.
Take your time with the more detailed rounds, especially when working the arches and crossed stitches. Once you get into the rhythm of the pattern, the design becomes much easier to follow.
Enjoy creating your Turkish Crochet Square, and have fun experimenting with different colors and ways to use your finished motifs. Happy crocheting!